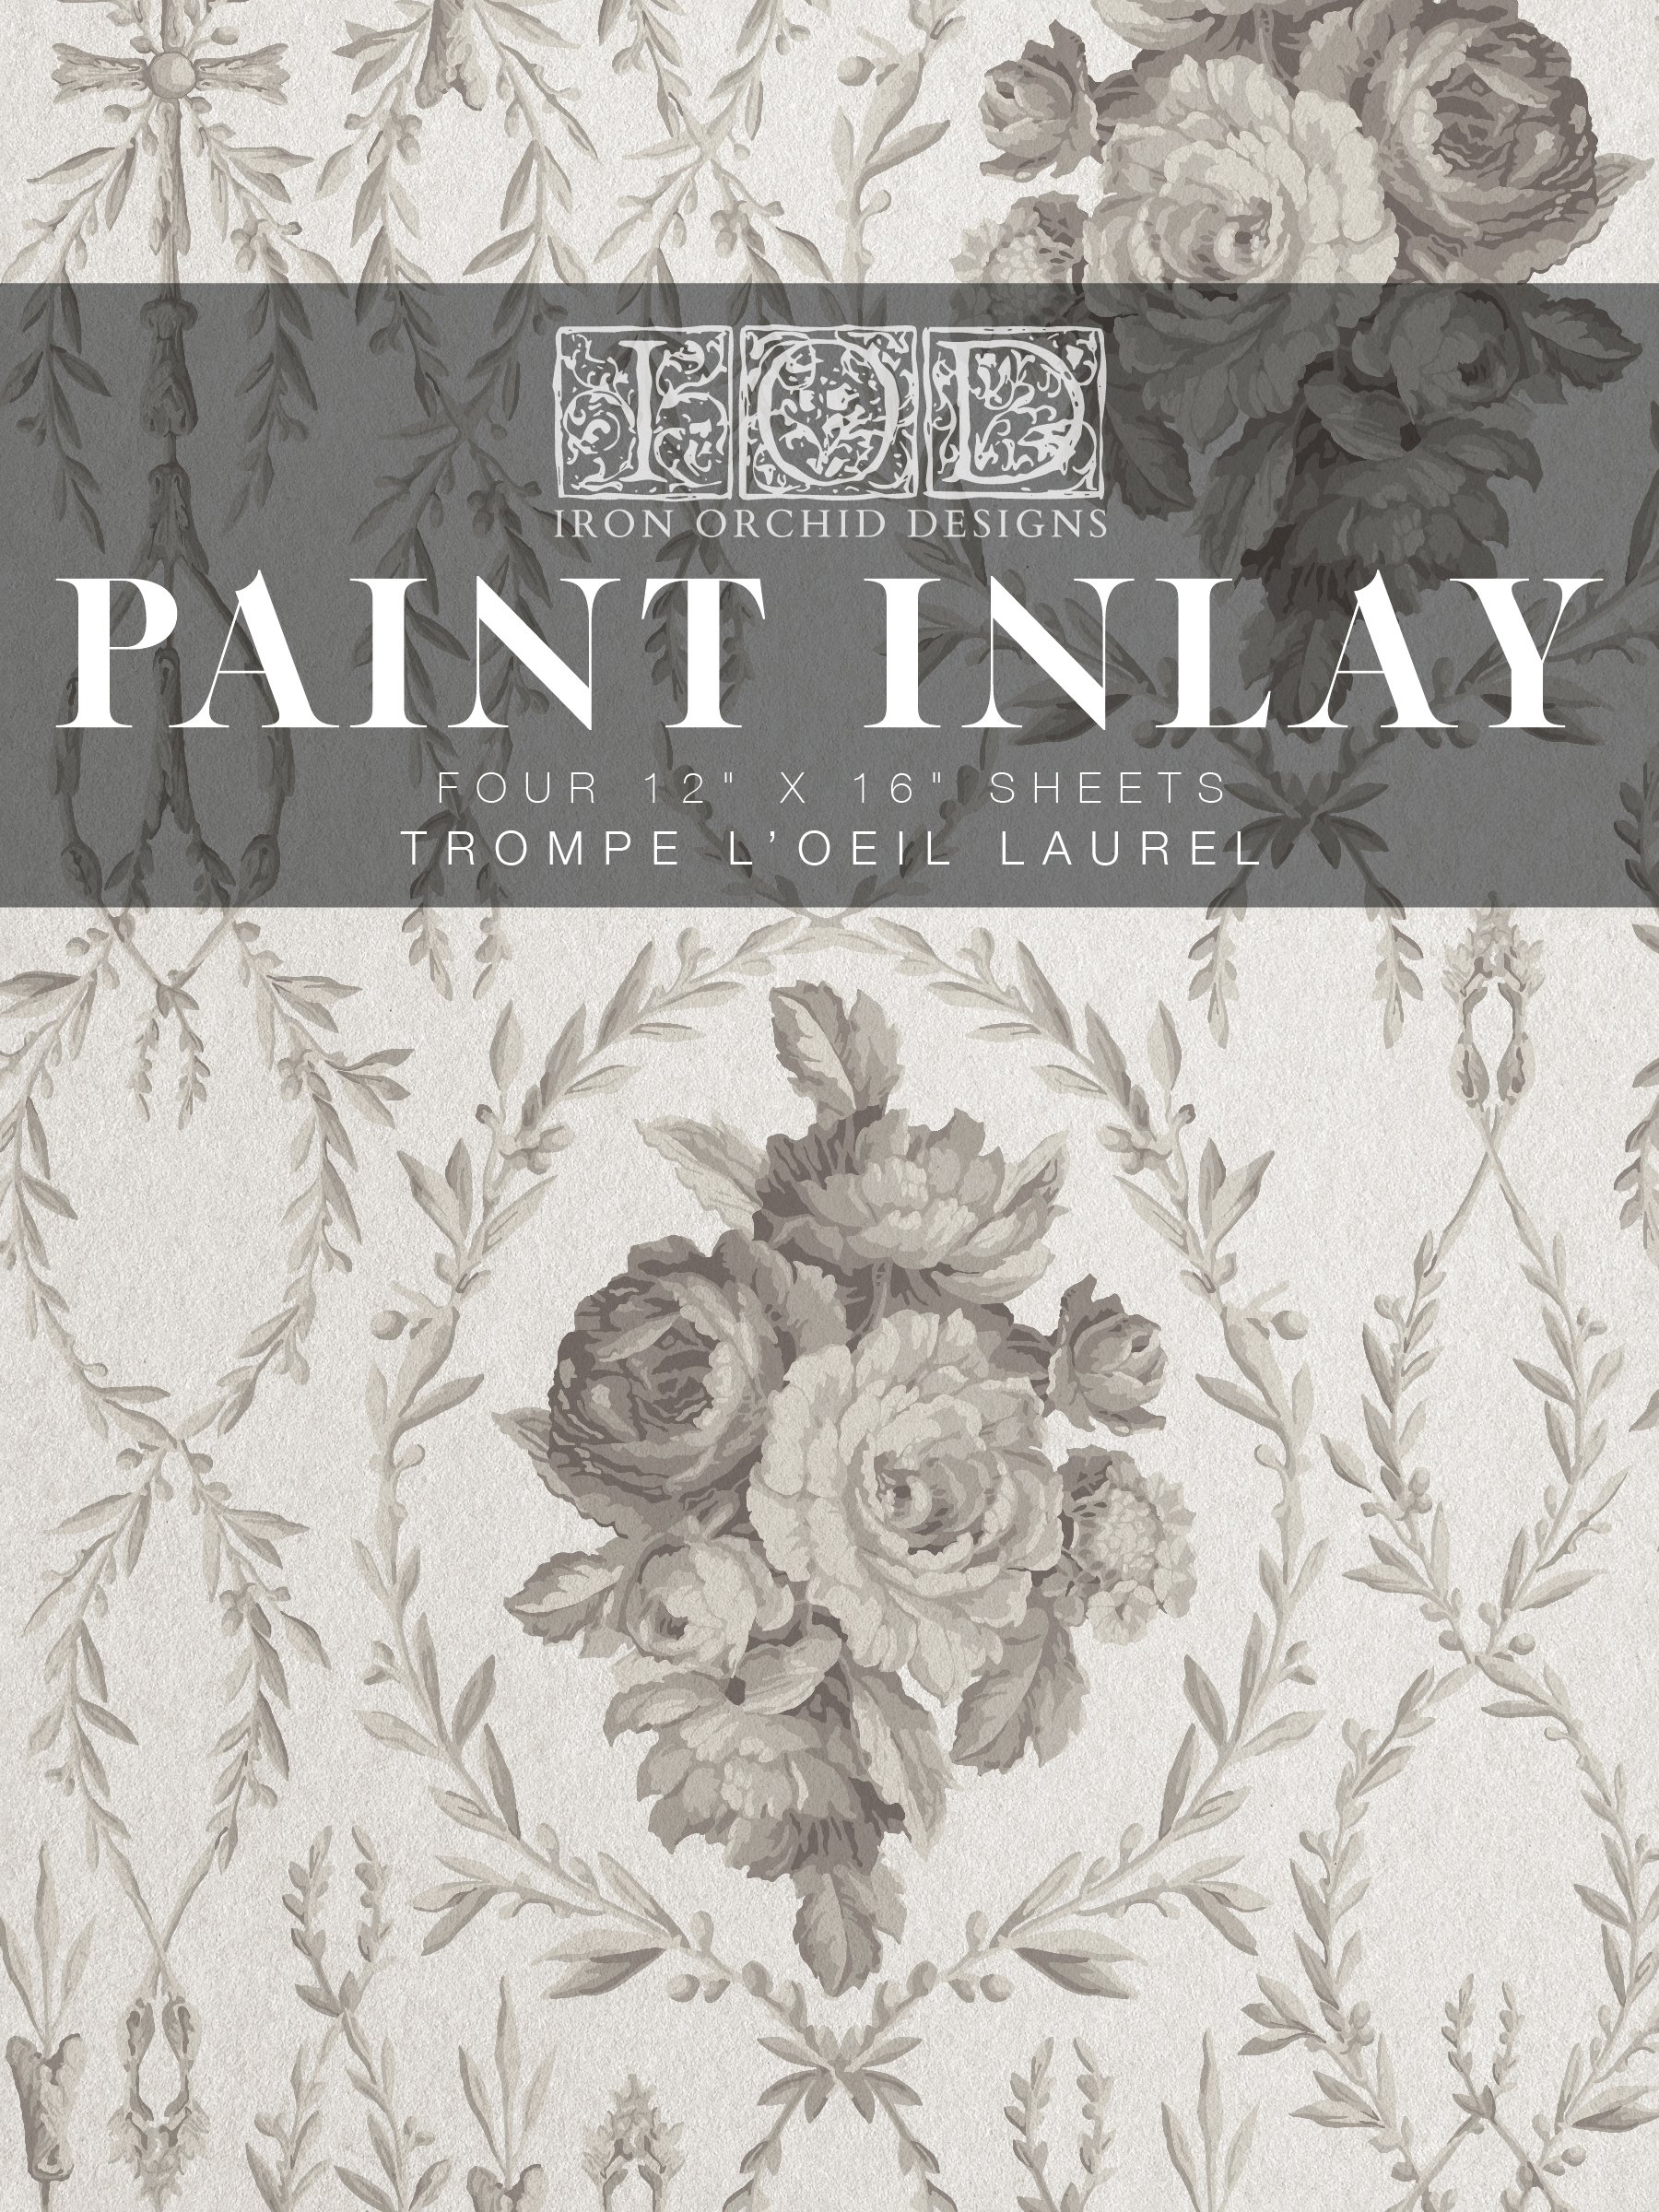


GRISAILLE TOILE IOD PAINT INLAY 12×16 PAD
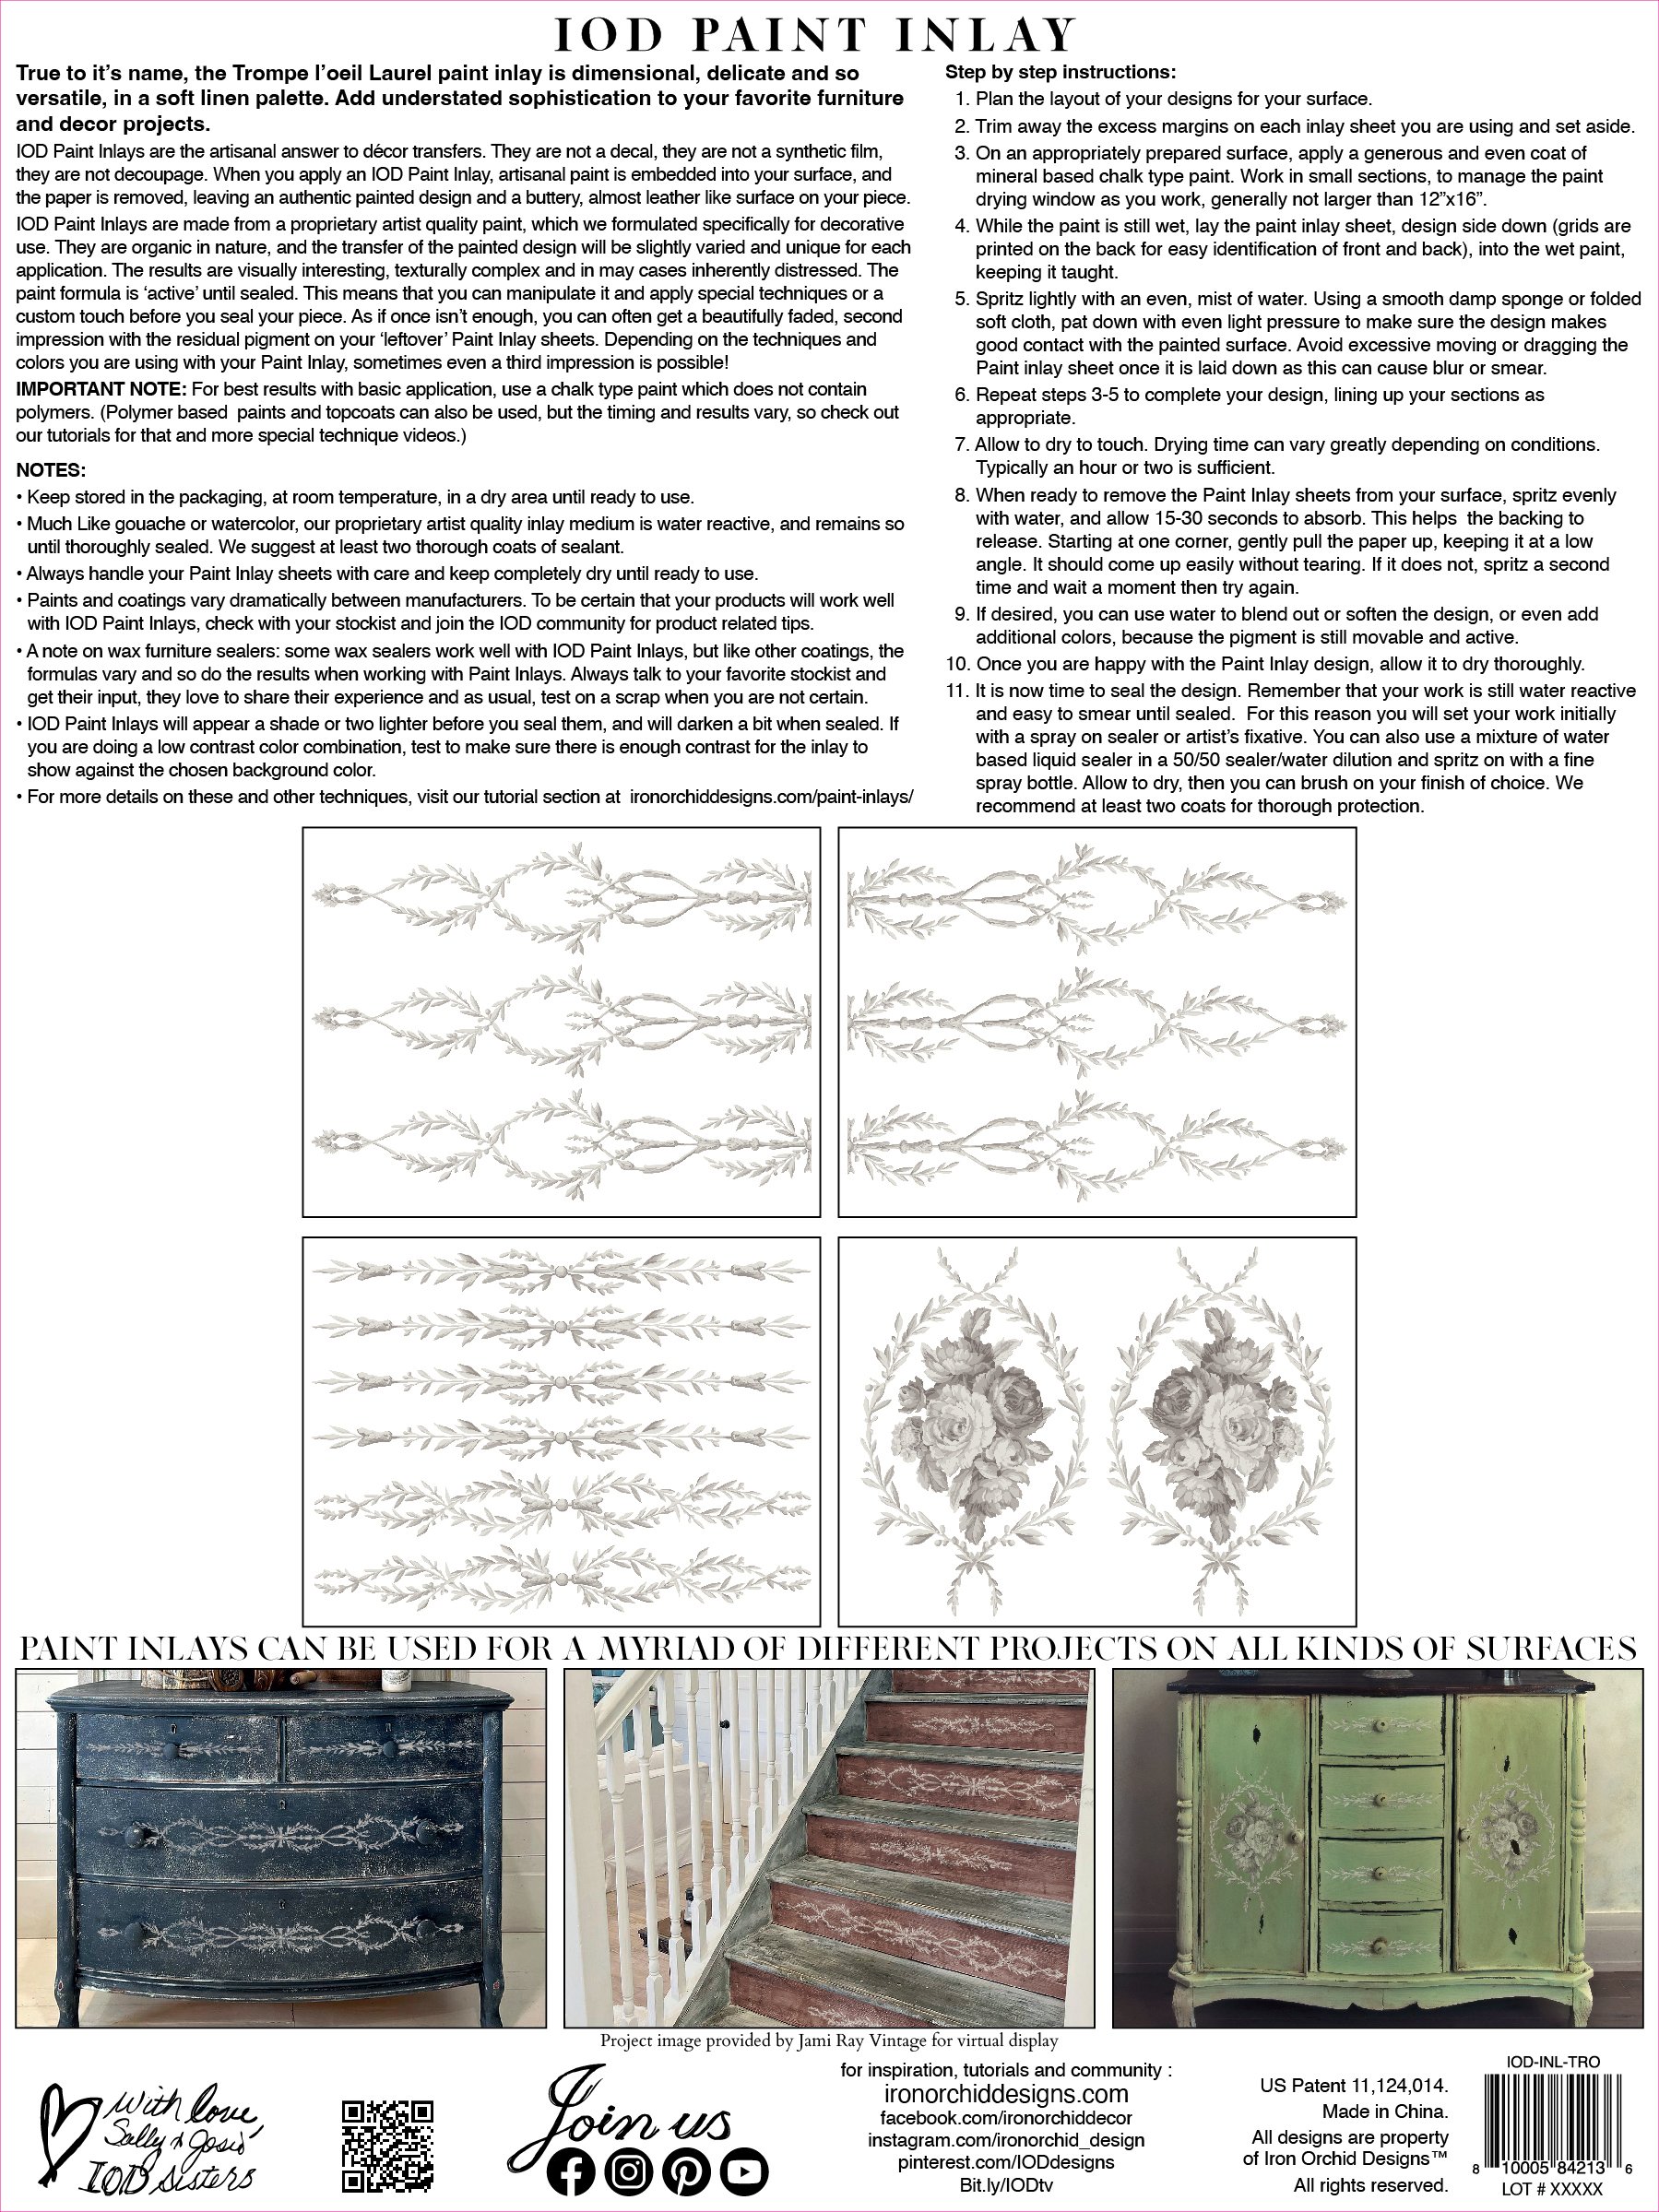
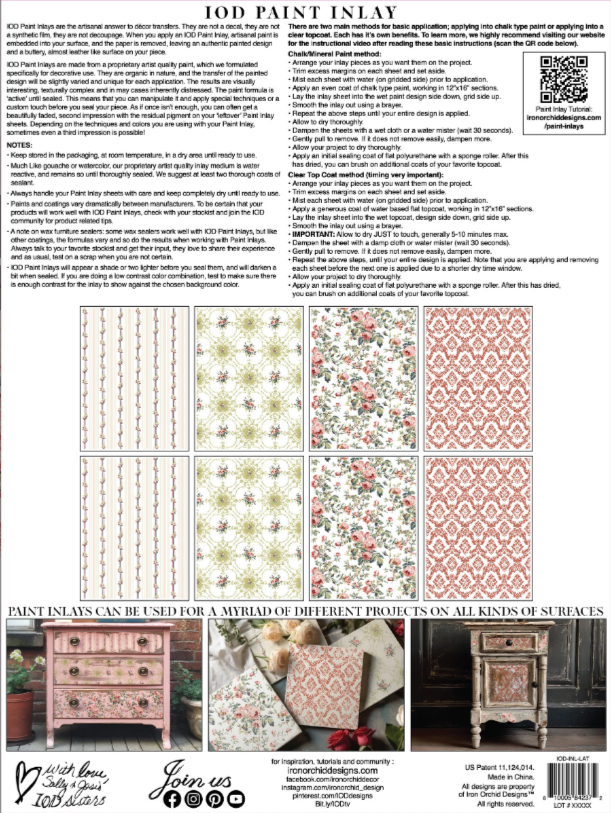
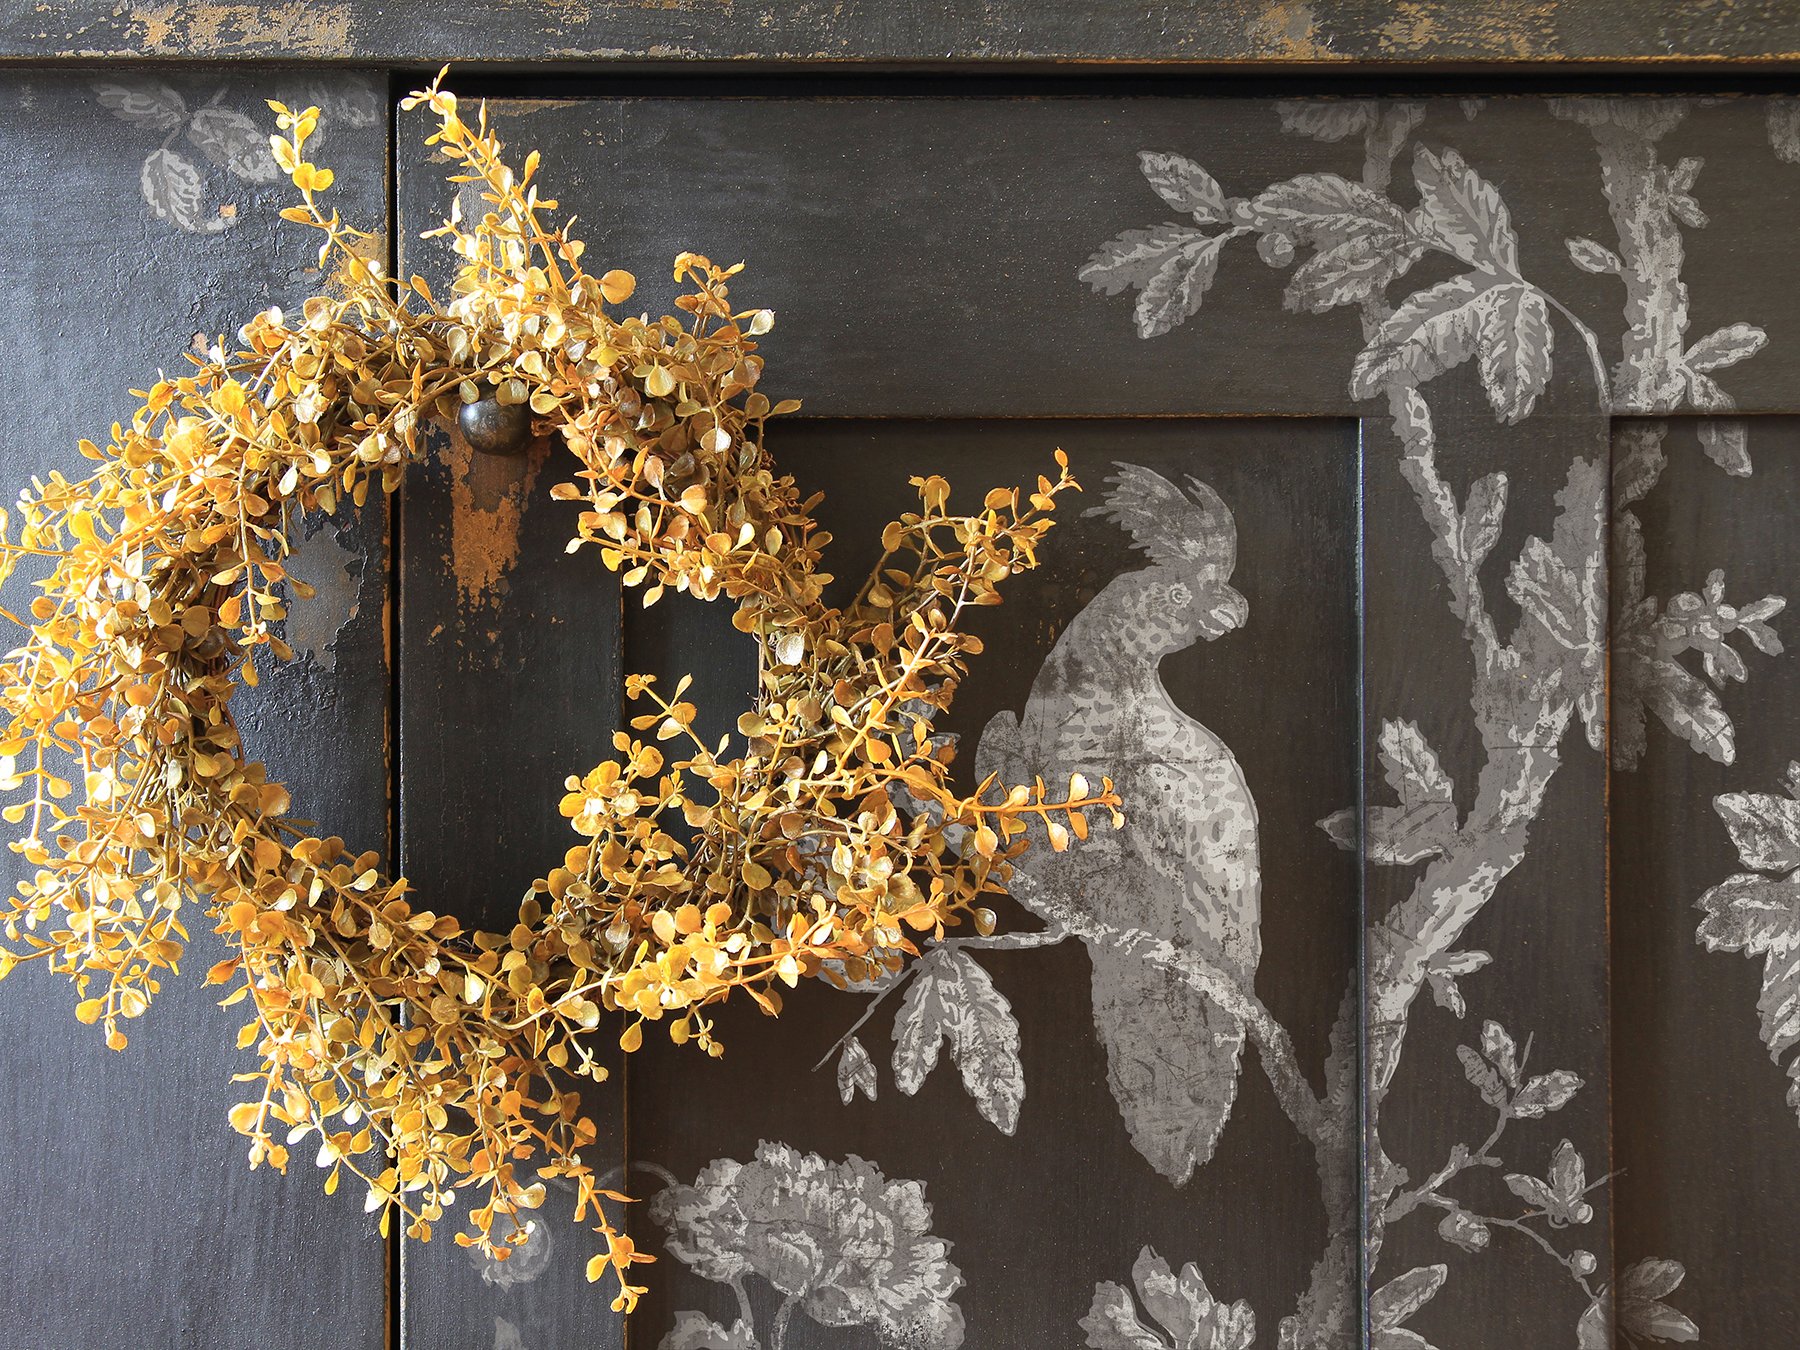
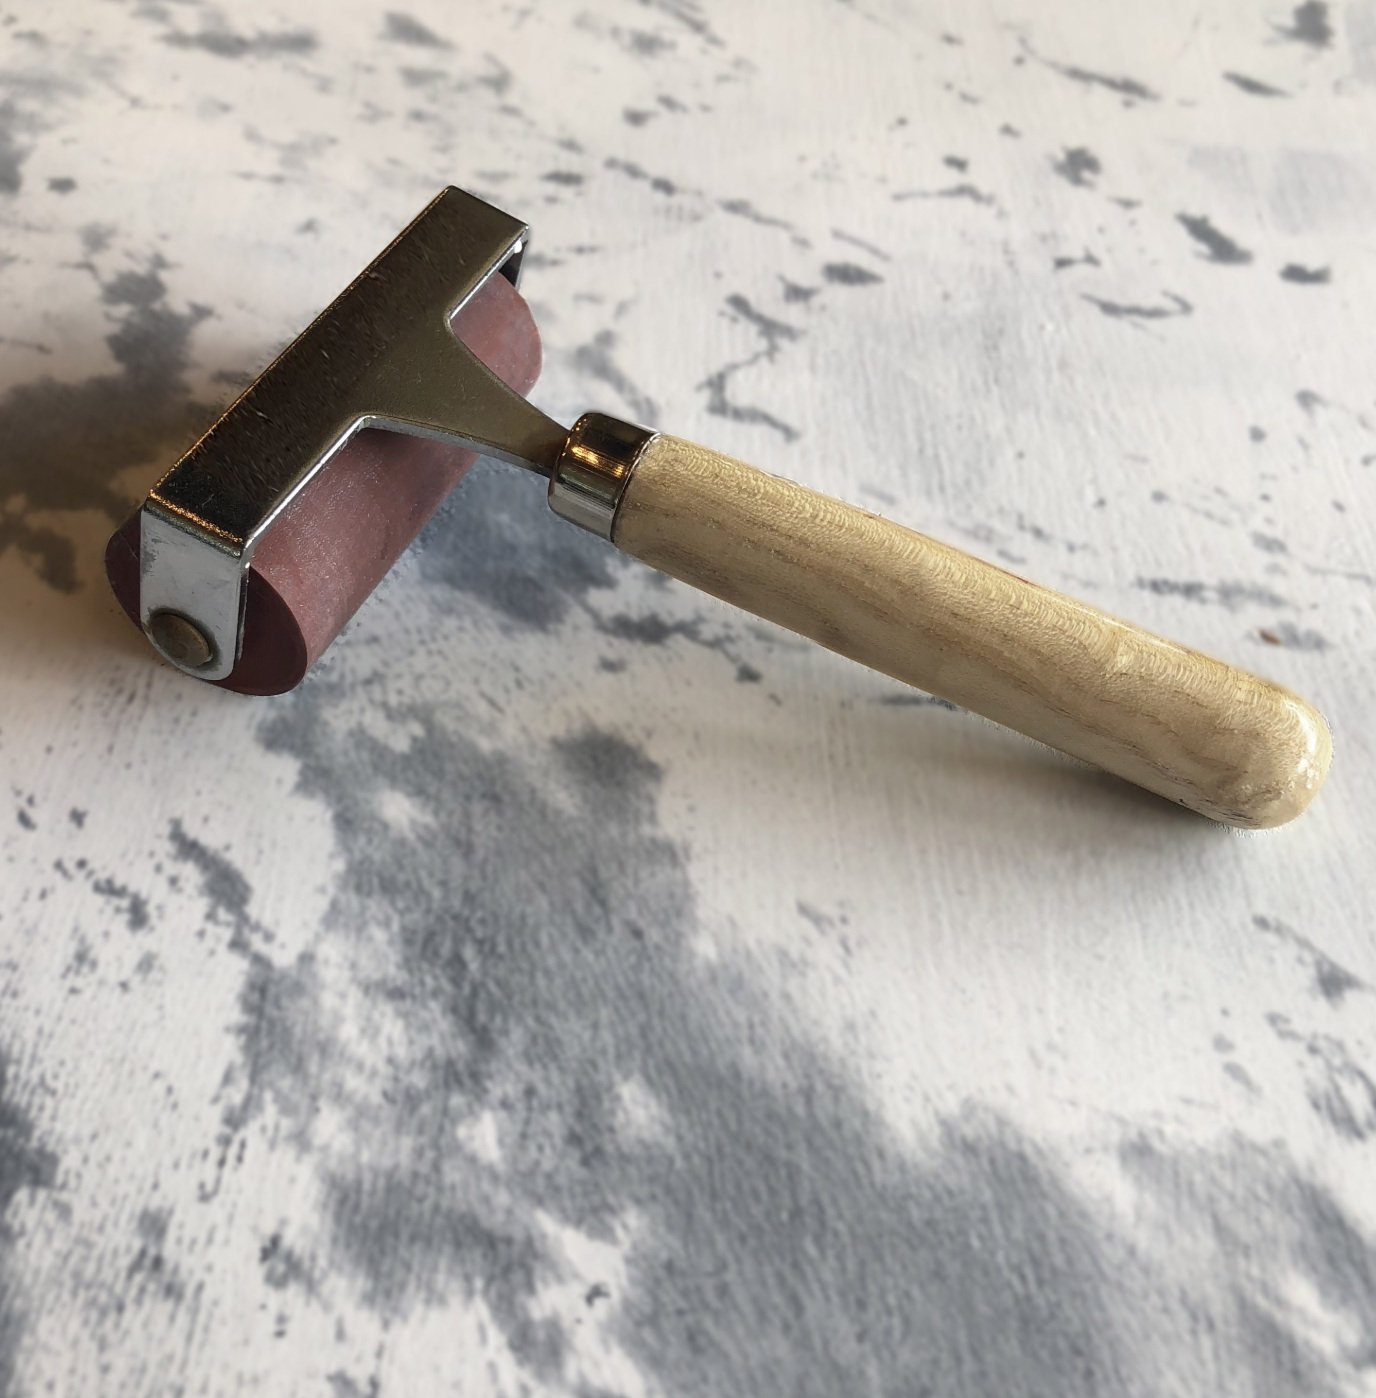
When you apply an IOD paint inlay, artisanal paint is embedded into your service in the paper is removed, leaving an authentic painted design and a buttery almost leather like surface on your piece. IOD paint and lays are made from a proprietary artist quality paint which we formulated specifically for decorative use. They are organic in nature and the transfer of the painted design will be slightly varied and unique for each individual. The results are visually interesting, texturally complex, and often inherently distressed. The paint formula is active until sealed. That means that you can manipulate it and apply special techniques or a custom touch before you seal your piece. And, as if once isn't enough, you can often get a beautifully faded second impression, with a residual pigment on your left over inlay sheets. Depending on the techniques and colors you're using with your paint inlay, sometimes you can even get a third impression! An important note: for the best results with a basic application, use a chalk type paint that does not contain polymers. STEP BY STEP INSTRUCTIONS: 1.) Plan the Layout of your designs for your surface. 2.) Using the grids on the back of the inlay sheet, trim as needed and set aside. If you are using a repeat pattern and lining the pattern up continuously, then trim excess margin on each sheet. 3.) On an appropriately prepared surface, apply a generous and even coat of a mineral based chalk-type paint. Work in small sections to manage the paint-drying window as you work. Generally not larger than 12”x16” 4.) While paint is still wet, lay the paint inlay sheet, design side down (grids are printed on the back for easy identification of front and back), into the wet paint, keeping it taut. 5.) Spritz lightly with an even mist of water. Using a smooth, damp sponge or folded soft cloth, pat down with light and even pressure to make sure the design makes good contact with the painted surface. Avoid excessive moving or dragging of the paint Inlay sheet once it is laid down, as this can cause a blur or smear. 6.) Repeat steps 3-5 to complete your design, lining up your sections as appropriate. The gridlines can help to match pattern edges when needed. 7.) Allow to dry to the touch. Drying times can vary anywhere from 10 minutes to 1 hour, depending on conditions. 8.) When ready to remove the Paint Inlay sheets from your surface, spritz evenly with water, and allow 30 seconds to absorb; this helps the backing to release. Starting at one corner, gently pull the paper up, keeping it at a low angle. It should come up easily without tearing. If it does not, spritz a second time and wait a moment, then try again. 9.) If desired, you can use water to blend out of soften the design, because the pigment it still movable and active. You can even add additional colors. 10.) Once you are happy with the Paint Inlay Design, it is time to seal it. There are a few different options for sealing: a. Apply a water-based polyurethane directly over your work. Be careful not to overwork the sealer. With this method, you may notice a small amount of pigment migration; this is minimized by avoiding overworking of the sealer. b. Set your work initially with a spray on sealer or artist’s fixative. Allow to dry. Apply your finish of choice. c. You can use wax to seal your piece. Applying according to product directions.
When you apply an IOD paint inlay, artisanal paint is embedded into your service in the paper is removed, leaving an authentic painted design and a buttery almost leather like surface on your piece. IOD paint and lays are made from a proprietary artist quality paint which we formulated specifically for decorative use. They are organic in nature and the transfer of the painted design will be slightly varied and unique for each individual. The results are visually interesting, texturally complex, and often inherently distressed. The paint formula is active until sealed. That means that you can manipulate it and apply special techniques or a custom touch before you seal your piece. And, as if once isn't enough, you can often get a beautifully faded second impression, with a residual pigment on your left over inlay sheets. Depending on the techniques and colors you're using with your paint inlay, sometimes you can even get a third impression! An important note: for the best results with a basic application, use a chalk type paint that does not contain polymers. STEP BY STEP INSTRUCTIONS: 1.) Plan the Layout of your designs for your surface. 2.) Using the grids on the back of the inlay sheet, trim as needed and set aside. If you are using a repeat pattern and lining the pattern up continuously, then trim excess margin on each sheet. 3.) On an appropriately prepared surface, apply a generous and even coat of a mineral based chalk-type paint. Work in small sections to manage the paint-drying window as you work. Generally not larger than 12”x16” 4.) While paint is still wet, lay the paint inlay sheet, design side down (grids are printed on the back for easy identification of front and back), into the wet paint, keeping it taut. 5.) Spritz lightly with an even mist of water. Using a smooth, damp sponge or folded soft cloth, pat down with light and even pressure to make sure the design makes good contact with the painted surface. Avoid excessive moving or dragging of the paint Inlay sheet once it is laid down, as this can cause a blur or smear. 6.) Repeat steps 3-5 to complete your design, lining up your sections as appropriate. The gridlines can help to match pattern edges when needed. 7.) Allow to dry to the touch. Drying times can vary anywhere from 10 minutes to 1 hour, depending on conditions. 8.) When ready to remove the Paint Inlay sheets from your surface, spritz evenly with water, and allow 30 seconds to absorb; this helps the backing to release. Starting at one corner, gently pull the paper up, keeping it at a low angle. It should come up easily without tearing. If it does not, spritz a second time and wait a moment, then try again. 9.) If desired, you can use water to blend out of soften the design, because the pigment it still movable and active. You can even add additional colors. 10.) Once you are happy with the Paint Inlay Design, it is time to seal it. There are a few different options for sealing: a. Apply a water-based polyurethane directly over your work. Be careful not to overwork the sealer. With this method, you may notice a small amount of pigment migration; this is minimized by avoiding overworking of the sealer. b. Set your work initially with a spray on sealer or artist’s fixative. Allow to dry. Apply your finish of choice. c. You can use wax to seal your piece. Applying according to product directions.
When you apply an IOD paint inlay, artisanal paint is embedded into your service in the paper is removed, leaving an authentic painted design and a buttery almost leather like surface on your piece. IOD paint and lays are made from a proprietary artist quality paint which we formulated specifically for decorative use. They are organic in nature and the transfer of the painted design will be slightly varied and unique for each individual. The results are visually interesting, texturally complex, and often inherently distressed. The paint formula is active until sealed. That means that you can manipulate it and apply special techniques or a custom touch before you seal your piece. And, as if once isn't enough, you can often get a beautifully faded second impression, with a residual pigment on your left over inlay sheets. Depending on the techniques and colors you're using with your paint inlay, sometimes you can even get a third impression! An important note: for the best results with a basic application, use a chalk type paint that does not contain polymers. STEP BY STEP INSTRUCTIONS: 1.) Plan the Layout of your designs for your surface. 2.) Using the grids on the back of the inlay sheet, trim as needed and set aside. If you are using a repeat pattern and lining the pattern up continuously, then trim excess margin on each sheet. 3.) On an appropriately prepared surface, apply a generous and even coat of a mineral based chalk-type paint. Work in small sections to manage the paint-drying window as you work. Generally not larger than 12”x16” 4.) While paint is still wet, lay the paint inlay sheet, design side down (grids are printed on the back for easy identification of front and back), into the wet paint, keeping it taut. 5.) Spritz lightly with an even mist of water. Using a smooth, damp sponge or folded soft cloth, pat down with light and even pressure to make sure the design makes good contact with the painted surface. Avoid excessive moving or dragging of the paint Inlay sheet once it is laid down, as this can cause a blur or smear. 6.) Repeat steps 3-5 to complete your design, lining up your sections as appropriate. The gridlines can help to match pattern edges when needed. 7.) Allow to dry to the touch. Drying times can vary anywhere from 10 minutes to 1 hour, depending on conditions. 8.) When ready to remove the Paint Inlay sheets from your surface, spritz evenly with water, and allow 30 seconds to absorb; this helps the backing to release. Starting at one corner, gently pull the paper up, keeping it at a low angle. It should come up easily without tearing. If it does not, spritz a second time and wait a moment, then try again. 9.) If desired, you can use water to blend out of soften the design, because the pigment it still movable and active. You can even add additional colors. 10.) Once you are happy with the Paint Inlay Design, it is time to seal it. There are a few different options for sealing: a. Apply a water-based polyurethane directly over your work. Be careful not to overwork the sealer. With this method, you may notice a small amount of pigment migration; this is minimized by avoiding overworking of the sealer. b. Set your work initially with a spray on sealer or artist’s fixative. Allow to dry. Apply your finish of choice. c. You can use wax to seal your piece. Applying according to product directions.